As a data analyst expert or newbie, have you ever wondered how you can stay relevant in the 2023 job market with the skills you currently have?
In this article, we’ll provide you with the top 5 must-have skills every data analyst should get familiar with or even more familiar with — if you already know it — in 2023.
Aside helping organizations employ business data to make profitable and accurate decisions, a data analyst should also be able to visualize data and give expert reports on how this data can
To stay on course, here are top 5 skills you should stick with as a data professional in 2023.
Top 5 Data Analyst Skills in 2023
Spreadsheet Proficiency
Microsoft Excel is that tool for data cleaning and analytical activities, like mini data cleaning and exploration, simple interactive dashboards with pivot charts, and even advanced Excel using VBA to automate the analytical process. If you are a data noob, Excel is a perfect catch as you can manipulate and analyze data without knowing how to use programming technologies like R or Python.
SQL and Database Management
SQL or Structured Query Language is crucial for interacting with the database. It handles large data sizes that spreadsheets can’t handle (e.g., billions of rows).
Analysts use SQL for the following reasons:
Query the data in the database.
Insert data into the database.
Update the database,
Modify schemas (i.e. database structure).
A visual display of an SQL tool
SQL mastery is a skill demanded by over 80% of data analyst job descriptions
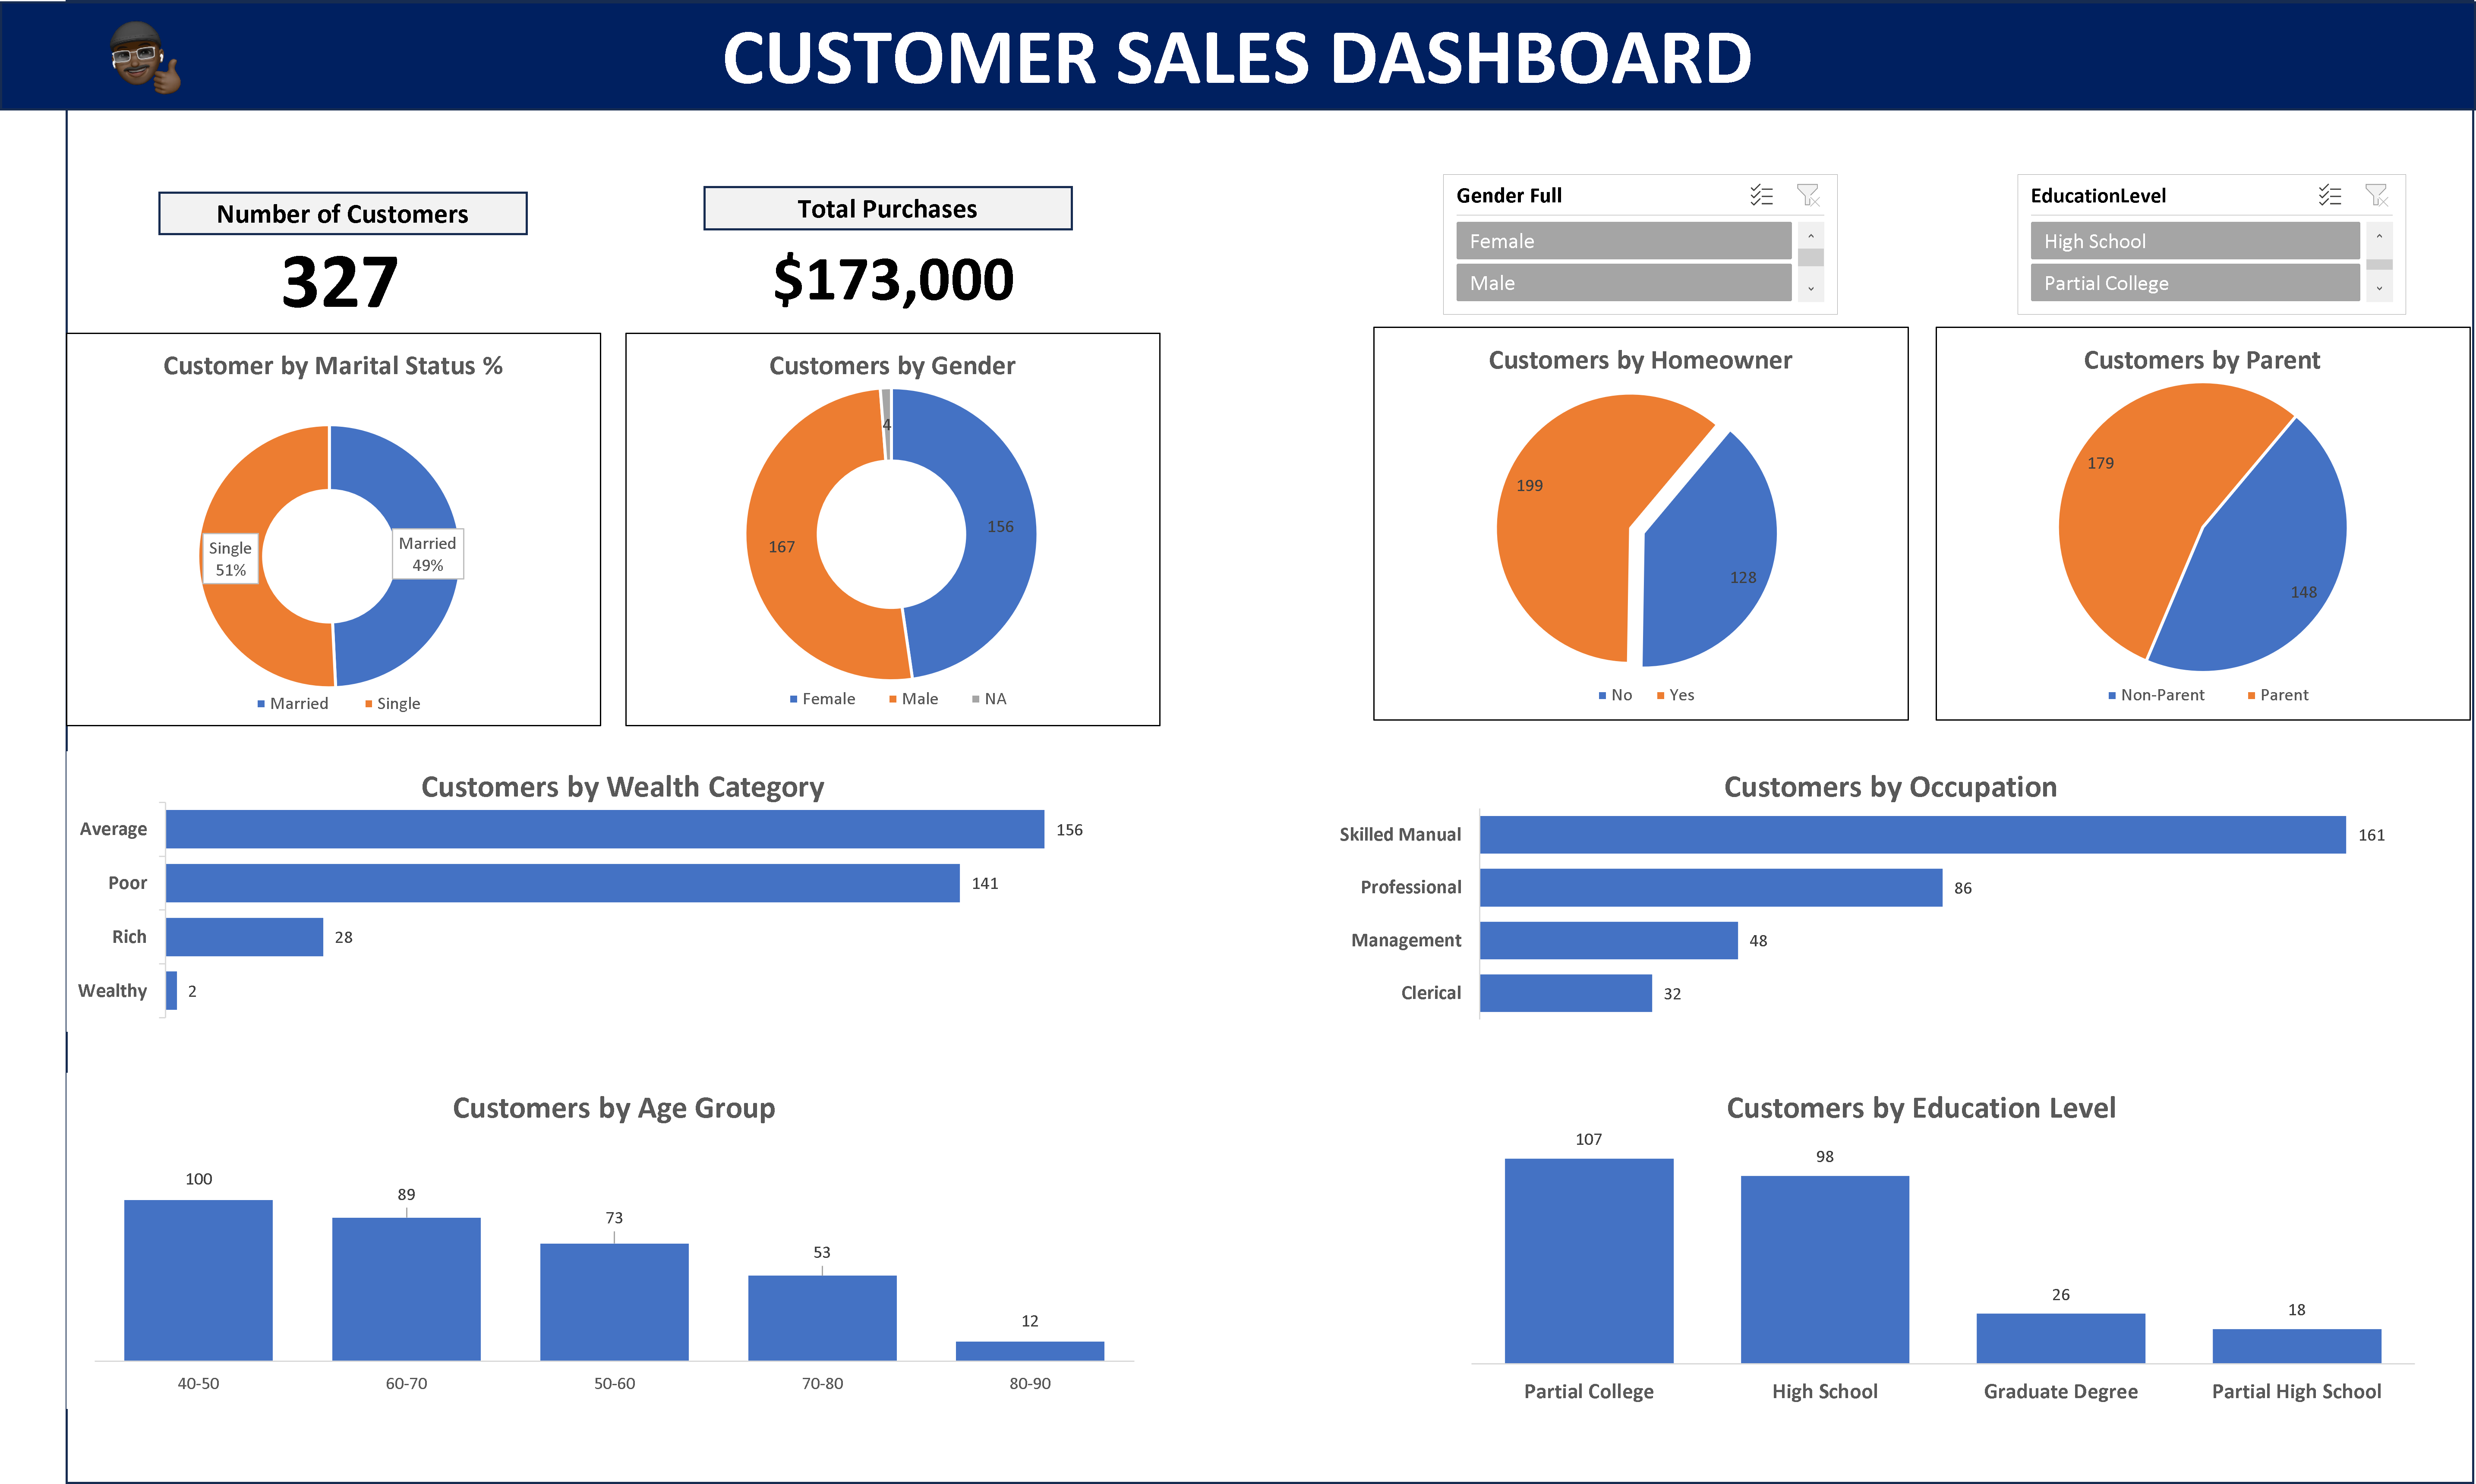
3. Data Visualization
Stakeholders understand data better through visuals and reports. You must know how to present your findings in simple graphs.
A dashboard with several visuals of a customer’s purchases for a company.
Tools like PowerBI, Tableau, and Looker are essential for communicating insights to stakeholders who may not understand the underlying code. Because these tools help to craft visually compelling representations that reveal the narrative hidden within the data
4. Statistical Programming Languages
Data analysts use programming languages like Python or R to perform statistical functions or programs within a company’s data. These tools can help you quickly analyze and generate insights from large datasets. Some of the top programming languages used by data professionals include
R
Python
Java
Scala
Soft Skills for Data Analysts
While technical skills are crucial, complementing them with soft skills puts you in a stronger position than an analyst with only hard skills. Here’s a list of soft skills you need as a data analyst in 2023.
Critical thinking.
Problem-solving skills.
Affinity for numbers.
Logical and analytical mindset.
Communication.
Conclusion
The data world is evolving, but there are specific tools that you must have at all times.
To succeed as a data analyst, you must master spreadsheets, SQL, database management, data cleaning, and visualization.
Hard skills are only useful when combined with soft skills. Among the top 5 are communication, critical thinking, problem-solving, numbers affinity, and logical and analytical thinking.
In the ever-evolving world of software engineering, creating websites that look and function well across various devices is no longer a luxury; it is a necessity. This is where Bootstrap CSS comes into play. Bootstrap, a popular front-end framework, has revolutionized the way web developers approach responsiveness since its release in 2011.
Bootstrap CSS, alongside other CSS frameworks, such as Tailwind CSS, Foundation, Bulma, Skeleton, etc., has simplified the complexities of creating responsive layouts for websites.
In this comprehensive guide, I will take you on a journey through the fundamentals of Bootstrap and show you how to harness its power to bootstrap stunning and responsive layouts for your web projects.
What is Bootstrap?
At its core, Bootstrap is a comprehensive set of HTML, CSS, and JavaScript components and tools designed to simplify web development. It provides developers with a solid foundation upon which to build responsive and visually appealing websites and web applications. Bootstrap’s primary focus is responsive design, ensuring that your website or web application adapts seamlessly to different screen sizes, from the smallest smartphones to the largest desktop monitors.
In addition to these components, Bootstrap offers optional JavaScript plugins to improve user interactions and functionality.
Advantages of Choosing Bootstrap
Now that you have a basic understanding of what Bootstrap is, let’s explore why it has become the go-to choice for countless web developers:
1. Rapid Development: Bootstrap significantly accelerates the development process. It provides pre-designed components and a responsive grid system that allows developers to focus on creating content and functionality rather than starting from scratch with every project.
2. Consistency: Bootstrap enforces design consistency throughout your website or application. This is especially valuable when collaborating with multiple developers or designers, as it establishes a common design language and style guide.
3. Responsiveness: With Bootstrap, responsiveness is built-in. Your layouts will automatically adapt to different screen sizes, ensuring a seamless user experience on everything from mobile devices to desktops.
4. Customization: While Bootstrap comes with a sleek default theme, it is highly customizable. You can easily modify its appearance to match your project’s branding or create unique designs using Bootstrap as a foundation.
5. Strong Community and Resources: Bootstrap boasts a vibrant community of developers and a wealth of documentation, tutorials, and third-party themes and plugins. This makes it easy to find solutions to common challenges and stay up-to-date with best practices.
Now that we have scratched the surface of Bootstrap’s capabilities and you have read some of its advantages, let’s delve deeper into the practical aspects of getting started with Bootstrap in the next section.
Getting Started with Bootstrap
Bootstrap offers a quick and straightforward way to include its production-ready CSS and JavaScript in your project without the need for complex build steps.
Here is a step-by-step guide to help you get started:
Bootstrap provides a Content Delivery Network (CDN) that allows you to easily include its CSS and JavaScript files in your project. This means you can get up and running with Bootstrap in no time.
1. Create an HTML file
Start by creating a new index.html file in the root directory of your project. This file will serve as the entry point for your web application.
In this basic HTML template, you just included the essential meta tags for character encoding and responsive behavior. These tags ensure that your web page looks great on various devices, from smartphones to desktops.
2. Include Bootstrap’s CSS
Include Bootstrap’s CSS to style your web page by placing the <link> tag in your HTML document’s <head> section.
This <link> tag references Bootstrap’s CSS file from the CDN, ensuring that your web page is styled according to Bootstrap’s design principles.
To make use of Bootstrap’s interactive components and functionality, including its JavaScript, place the <script> tag for Bootstrap’s JavaScript bundle just before the closing </body> tag of your HTML document.
By including this <script> tag, you are not only adding Bootstrap’s JavaScript but also Popper, a library used for positioning dropdowns, popovers, and tooltips. This ensures that your Bootstrap components function correctly.
4. Optional: Include Popper and Bootstrap JavaScript Separately
If you do not plan to use dropdowns, popovers, or tooltips, you have the option to include Popper and Bootstrap JavaScript separately. This can help save some kilobytes by not including Popper when it is unnecessary.
With these steps, you have successfully set up Bootstrap in your project, allowing you to take advantage of its responsive grid system and pre-designed UI components. In the upcoming sections of this article, we will explore how to leverage Bootstrap’s features to create stunning, responsive layouts for your web projects.
Creating Responsive Layouts with Bootstrap
This flexible and powerful system uses a combination of containers, rows, and columns, all built with the power of Flexbox, to help you achieve pixel-perfect alignment and responsiveness across a wide range of devices and screen sizes.
Understanding the Bootstrap Grid System
Before we delve into the specifics, let’s understand the fundamental components of the Bootstrap grid system:
Containers: Containers provide the outermost wrapper for your content. They help center your content and provide padding on the left and right sides. Bootstrap offers both fixed-width (container) and full-width (container-fluid) containers.
Rows: Rows are used to contain and clear a set of columns. They ensure that columns align well and do not overlap. Rows are placed inside containers.
Columns: Columns are the building blocks of your layout. You can specify how many columns each element should span, and Bootstrap will take care of the rest. Columns are placed inside rows.
Now, let’s explore some practical applications of this grid system.
Auto-layout Columns
Bootstrap offers a variety of ways to create responsive columns without the need for explicit numerical classes like .col-sm-6. These auto-layout columns adapt automatically to different screen sizes.
Equal-width Columns
You can create equal-width columns that apply to every device and viewport, from extra-small (xs) to extra-extra-large (xxl). Add unit-less classes to specify how many columns you need, and Bootstrap ensures that each column is of the same width.
<div class="container text-center">
  <div class="row">
    <div class="col">
      1 of 2
    </div>
    <div class="col">
      2 of 2
    </div>
  </div>
  <div class="row">
    <div class="col">
      1 of 3
    </div>
    <div class="col">
      2 of 3
    </div>
    <div class="col">
      3 of 3
    </div>
  </div>
</div>
In the example above, we have two rows, each containing equal-width columns. Whether on a large desktop screen or a mobile device, these columns will adjust automatically to occupy the available space evenly.
Setting One Column Width
Bootstrap’s auto-layout for flexbox grid columns allows you to set the width of just one column, and the sibling columns will automatically resize around it. You can achieve this using predefined grid classes, grid mixins, or inline widths.
<div class="container text-center">
  <div class="row">
    <div class="col">
      1 of 3
    </div>
    <div class="col-6">
      2 of 3 (wider)
    </div>
    <div class="col">
      3 of 3
    </div>
  </div>
  <div class="row">
    <div class="col">
      1 of 3
    </div>
    <div class="col-5">
      2 of 3 (wider)
    </div>
    <div class="col">
      3 of 3
    </div>
  </div>
</div>
In this example, the second column is explicitly set to be wider (col-6 and col-5, respectively), and the other columns adjust their widths accordingly. This flexibility makes it easy to create complex layouts that adapt beautifully to various screen sizes.
Wrapping Up
Bootstrap is generally considered an opinionated library, which means it has a set of assumptions and guidelines for building responsive and mobile-first web applications. While it offers a wide range of customizable components and tools, it is designed to be used in a specific way to achieve consistent and predictable results.
Using Bootstrap to quickly bootstrap your web development project sets you one step ahead and brings you closer to completing your development in no time. This is because you no longer have to worry about the hard parts, such as stylings, responsiveness, components, etc. because Bootstrap takes care of those.
In this article, walked through setting up Bootstrap in your web project. By embracing Bootstrap, you not only save time but also ensure your projects look exceptional on screens of all sizes, thus enabling you to build mobile-friendly websites.
In today’s data-driven world, the ability to transform raw data into actionable insights is a valuable skill. Power BI, a business intelligence tool developed by Microsoft, is a powerful tool that allows you to do just that. Whether you’re a business analyst, data scientist, or simply someone interested in harnessing the power of data, this step-by-step guide for beginners will help you get started with Power BI.
How Does Power BI Work?
Before we dive into the technical aspects, let’s understand what Power BI is and how it works. Power BI is a business intelligence tool that enables users to connect to various data sources, transform raw data into meaningful visualisations, and share these insights with others. It is a suite of tools and services with varying possibilities like; Power BI Desktop, Power BI Service (for online collaboration), and Power BI Mobile (for on-the-go access).
Power BI works by following these key steps:
Data Ingestion: Power BI can connect to a wide range of data sources, including databases, spreadsheets, and cloud-based services. It imports or connects to this data to create a dataset.
Data Transformation: Once the data is loaded, you can clean, transform, and shape it using Power Query, a built-in data preparation tool. This ensures that your data is accurate and suitable for analysis.
Data Modelling: Power BI uses a modelling language called DAX (Data Analysis Expressions) to create relationships between tables and define calculated measures. This step is crucial for creating meaningful visualisations.
Visualisation: You can create a variety of visualisations, such as charts, graphs, and tables, to represent your data in a visually appealing and understandable format.
Report Building: Power BI also allows you to create interactive reports by adding visualisations, text boxes, and slicers to a canvas. Users can interact with these reports to gain insights.
Sharing and Collaboration: You can publish your reports and dashboards to the Power BI Service, making them accessible to others. This enables collaboration and real-time sharing of insights.
Now that you have a basic understanding of how Power BI works, let’s explore how it compares to other popular data analysis tools.
Power BI, Excel, and Tableau: How They Compare and Differ
Power BI, Excel, and Tableau are all powerful tools for data analysis, but they serve different purposes and have distinct features:
Excel: Excel is a familiar spreadsheet tool that many professionals use for data analysis. It is suitable for small-scale data analysis and reporting. Power BI, on the other hand, is designed for larger datasets and offers more advanced visualisation options and data modelling capabilities.
Tableau: Tableau is another popular data visualisation tool. While Tableau is known for its flexibility and robust visualisation capabilities, Power BI is often preferred by organisations that already use Microsoft products, as it seamlessly integrates with other Microsoft tools like Excel and SharePoint.
Power BI: Power BI is a dedicated business intelligence tool that offers a wide range of data connectors, data modelling capabilities, and interactive visualisations. It excels in creating interactive dashboards and sharing insights with colleagues.
Installing Power BI for Desktop
Getting started with Power BI is easy. Follow these steps to install Power BI Desktop:
Step 2: Select ” PBIDesktopSetup.exe ” or “PBIDesktopSetup_x64.exe” and click the “Download” button.
Step 3: Run the downloaded installer file.
Step 4: Accept the licence agreement and follow the on-screen instructions to complete the installation.
Step 5: Once installed, launch Power BI Desktop.
Now you have Power BI Desktop installed and ready to use.
Additional Tips for Getting Started with Power BI
While we’ve covered the basics, there are a few more tips to help you get started with Power BI:
Explore the Power BI Community: Join the Power BI Community to ask questions, share your insights, and learn from experienced users.
Take Online Courses: Microsoft offers free online courses and tutorials to help you master Power BI. These courses cover everything from data modelling to advanced visualisation techniques.
Practice, Practice, Practice: The best way to learn Power BI is by using it regularly. Start with simple projects and gradually work your way up to more complex analyses.
Stay Updated: Power BI is continually evolving, with new features and updates released regularly. Stay informed about the latest developments to make the most of this powerful tool.
Conclusion
Getting started with Power BI may seem daunting at first, but with the right guidance and a bit of practice, you can unlock the potential of your data and turn it into valuable insights. Start your Power BI journey today and watch your data come to life.
Picture a gourmet chef in a kitchen: his ingredients arranged atop a wooden table, apron firmly girded around his torso and neck, hands on a sharp-edged knife chopping a piece of steak with dexterity.
Without a doubt, he knows the right amount of seasoning he needs in preparing a sumptuous meal.
The Tech Industry functions in the same way, but with a different terminology. In order to build software that will solve everyday problems in the world, Software Engineers implore a recipe called: The Software Development Life Cycle (SLDC).
In this article, I’ll take you through the intriguing world of SLDC.
What is the Software Development Lifecycle?
Various tech organizations and blogs have provided different definitions of the Software Development Life Cycle (SDLC).
According to AWS, it is a methodical and resource-efficient approach employed by development teams to conceive, create, and deliver top-notch software within a defined time and budget constraint.
On the other hand, GeeksforGeeks defined it as a well-structured and systematic process employed to conceive, craft, and test good quality software.
Drawing from these perspectives, I’ll interpret the Software Development Life Cycle as a systematic approach employed by development teams to plan, design, build, and thoroughly test software and its related products.
Phases Involved in Software Development Lifecycle
A typical Software Development Life Cycle run through the following stages: · Planning · Requirement gathering and analysis · Designing the product architecture · Development · Product testing and integration · Deployment and maintenance of products
Planning This is the beginning of the cycle, where project goals, objectives, requirements, and budget are discussed. Inputs are collected from various stakeholders who have a vested interest in the project. The team at this stage determines the feasibility of the project and how they can implement it with minimum risk.
Requirements Gathering and Analysis All the requirements for the project are specified. The different goals and objectives outlined in the planning stage are collated into clear requirements for the development team. The team uses the collected data to create a formal working document known as a Software Requirement Specification (SRS) document. After this document has been reviewed and approved by stakeholders, it serves as a guide throughout the designing and development process.
Designing the Product Architecture During this stage, the Software Requirement Specification (SRS) document is translated into design designers create and test several designs and ideas before selecting the final prototype to the team an idea of what the product will look like, and make changes, without having to write code.
Development The development phase divides tasks in the project into modules and assigns them to the different programmers in the team. In this phase, the software requirements outlined in the project are translated into code, using the chosen programming language. This phase is usually the longest phase of the Software Development Life Cycle Process.
Product Testing and Deployment At this stage, several tests like unit testing, acceptance testing, integration testing, etc. are carried out to ensure the product solves the needs outlined in the requirements. The Quality Assurance team usually does this. The developers fix any bug reported by the QA team, and the product is tested again, till the software is free of bugs. After passing through this rigorous process, the product is ready for deployment.
Maintenance This phase ensures the software continues to run as it is intended to. In this stage, the team resolves customer issues, fix bugs, monitor the performance of the software, and identifies new ways to improve the user experience.
The SDLC process may restart to release an update to the software.
Conclusion
By following this systematic journey through planning, design, development, testing, deployment, and maintenance, development teams can deliver high-quality software that meets user needs and adheres to project constraints.
A colorful slice of humanity find peace in improving the world, with their skills and resources; they are the volunteer community. A community where generosity and a thirst for adventure dance together.
To volunteer means to join a selected group of people who’d play a crucial role in addressing various societal and environmental needs like; hunger, homelessness, poverty, healthcare inequality and many more. It is an act of humanitarianism that helps to build up the community support social welfare and promote social harmony among people.
So, What is Volunteering?
Volunteering is giving one’s time, talents, and efforts to a cause without anticipating any form of compensation, unless stated. In the same vein, a person who chooses to serve the community, wholeheartedly, for a good cause, is called a Volunteer. A volunteer is driven by a pure desire to influence the world using his innate or refined skills to cause a positive turnaround.
In this article, we will:
Delve into various ways to volunteer.
Discuss the common challenges faced by volunteers and how to overcome them, and
The joys of volunteering
Ways to Volunteer
1. Local Community Involvement: Volunteering in your neighborhood is a powerful way to make a real difference. You can assist at local events, take part in neighborhood clean-up efforts and mentor young people in your community.
2. Nonprofit Organizations: Many non-governmental organizations rely largely on volunteers. Whatever may be your area of expertise, let’s say; web development, accountancy, or marketing, you can contribute to the success of these organizations.
3. Global Volunteering: If you have the time and money, think about volunteering abroad. This could be working as a volunteer for international health organizations, helping with relief efforts after natural disasters, or providing education in underdeveloped regions of the world.
4. Virtual Volunteering: You can also Volunteer from the convenience of your home thanks to technology. There are other distant impact options, like social media management, virtual event planning, and online tuition.
5. Corporate Volunteering: Some businesses promote volunteerism among their staff members as a way to uphold their commitment to Corporate Social Responsibility(CSR). This is a wonderful opportunity to strengthen relationships among coworkers while giving back to the community.
Overcoming Common Challenges in Volunteering
1. Time Constraints: It may be difficult to find time for volunteering due to busy schedules. To get around this, set your priorities, create attainable goals and resolve to volunteer, at least for a few hours every week.
2. Burnout: At times your commitment to volunteering might become intense for you. By establishing boundaries, letting the organization know what you can handle, and getting help when you need it, can help you avoid burnout.
3. Skills and Experience: Consider taking advantage of the training opportunities offered by the organizations if you feel your abilities don’t match their volunteer requirement. Never be scared to develop personally in addition to your voluntary work.
4. Financial Constraints: For some, the fact that volunteering is frequently underpaid may be a hurdle. If travel fees are a concern, look for programs that provide stipends or pay expenses. You might want to consider virtual volunteering.
5. Lack of Recognition: Sometimes volunteers may feel unappreciated. To combat this, ask for feedback, talk to people about your experiences, and keep in mind that your efforts have a positive effect.
The Joys of Volunteering
While volunteering undoubtedly benefits those in need, it also enriches the lives of the volunteers themselves. It fosters a sense of purpose, strengthens community bonds, and provides an opportunity to develop new skills and perspectives. Moreover, volunteering can be a source of personal fulfillment and happiness.
Conclusion
Volunteering is a life-changing experience that exemplifies the true meaning of generosity.
Individuals can start down a meaningful path of service, leaving a lasting legacy of positive change for future generations, by knowing what it means to volunteer, investigating various methods to get involved, and learning how to overcome common hurdles.